Wednesday, August 31, 2016

Vogue 8810 shirtdress and the endless summer...


It's almost fall and even I dream of autumn and those wonderful garment options that come with it. But I love Florida, and I'm content to sew for the climate. I will wear this cute dress all year 'round.

Yes, it's another maxi. But just pretend that it's short, if that's your thing :-) My first version of V8810 was short, but not worn a lot. For couple years I sewed things that interested me, but didn't particularly suit my lifestyle or needs. Since then I've become attached to maxi dresses - coverage, comfort, and a tropical vibe.

This pattern has lots of options - and a very pretty neckline that's a nice alternative to the collared look:


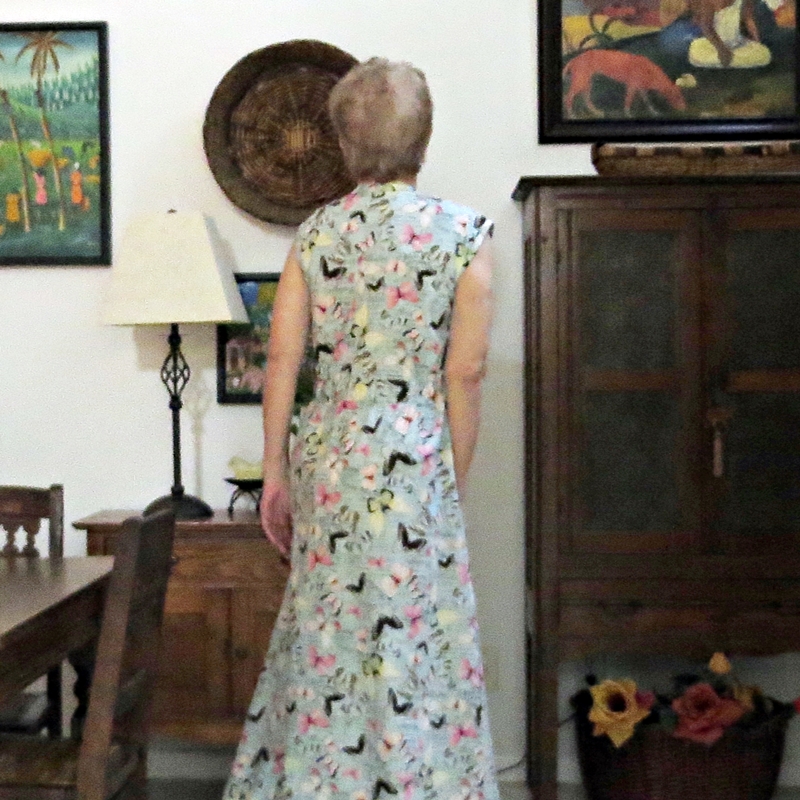
Butterfly on my shoulder...


I didn't use any of the skirt options - the full skirt is a 3/4 circle, just impossible when taken to a maxi length. And I don't do straight skirts! Instead, I used the skirt from the M6552 caftan dress. It's a slightly gathered A-line and fits this Vogue pattern, and me, really well.

A back view, slightly blurred because I had my camera set to take multiple shots. Not being a model, I moved...


Aside from the skirt replacement, I really didn't make a lot of changes. Mostly tweaks:

  • The armhole has facings, but I opted for self-fabric bias binding. I think it works and looks better.
  • As I noted in my first version, the shoulder on the pattern flies out and up a little bit. It's easy to correct once the bodice is put together at sides and shoulders.

From the pattern envelope

  • The dress is drafted with a blouson bodice. But that only works if the waist is pulled in enough to make it blouse. No way is this girl going to cinch in anything! Easily adjusted - I just took 5/8" off the length of the bodice - no extra fabric, no blousing...
  • And being picky - I used a large snap inside the front band, at the waistline, instead of a button.


Speaking of buttons, I used 12 on this dress! And once again, I have to mention my addiction to Frixion pens. I can write all over my garment (in this case, the front band when marking buttonholes), and the ink disappears if my iron gets anywhere close.


Twelve buttons were enough - I left a little interest at the bottom of the dress :-)


Fabric:  Susan Winget Botanical Buzz Butterfly Verbage [siccotton calico from JoAnns

Parting shot: An indulgence I'd rather have than ice cream - passion fruit (maracuya) preserves on homemade biscuits.


Tchau! Coco

Saturday, August 27, 2016

Vogue 9108 - now that's a project...


Oh, let's open with a picture of the only crepe paper flower I've managed to make this summer. It's so pretty!

And on to one of the most interesting projects I've undertaken lately - Marcy Tilton's French Apron Dress. I bought the pattern when it came out and have kind of ignored it ever since - because I knew in my heart that any attempt would require a lot of tweaking and fitting.


So right. I've put about 20 hours into this, it's finished, and I mean it's finished!! But it has some good parts. As we go forward, please know that this is a muslin. I used scrap fabrics (but all are poly ITY jersey), and tried to keep the color and print palette within reason.

The front. Great inserts and pockets.

Outside
Inside
The drafting on this is really nice, better, IMHO, than on Tilton's French House Dress (my version here, and another use of the over-sized drooped pocket).  I think the pockets are fun, and they drape really nicely in the ITY knit. Also, the upper front insert (dots fabric) is very believable, not cutesy.


I was a little concerned about how well the upper front would support the weight of the attached middle front (striped fabric). I didn't want a big dip! So I stabilized it with a strip of knit fusible. In fact, I did the same for many areas that might otherwise sag: top edges of pocket pieces, necklines, and the pivot corner that supports the pocket and middle front.


I also underlined the upper front and upper back to add stability. Not wanting to add weight, I used a very light burnout jersey. An added benefit - it has only 2-way stretch (horizontal), which counteracts the 4-way stretch of the dotted ITY.


The back - way easier than the front!


I love the placement of the upper back insert - it's very graceful.


A few sewing notes:
  • I sewed the size Large, but should have used the Medium. I bought the pattern before my breast surgery last year, and I'm lots smaller now - went from a C cup to an A. The pattern sizing is XS-M and L-XXL - I had to pick one. 
  • The pattern has a shoulder tab, from which the front and back are suspended. It's kind of like an epaulet, and I left it off completely. Thank you, Fabric Princess, for this idea, which lifts the armhole and makes it work for a sleeveless dress.
  • It also has huge facings for the armholes and back neckline. Not. I just used binding on the neckline and armholes. 
  • Sort of true to the 'apron' name, the front and back middle pieces are pleated into the upper pieces. A totally lost design element. I just gathered mine.
  • This dress is crazy voluminous below the waistline. I removed quite a bit from the lower back side seam:
  • My view of the multi-piece/contrast lower front is that it's just too much going on...I drafted it as one piece.
  • I also evened out the back hem, so it doesn't look like a mistake.
  • I made my dress to be midi-length, because I wanted to be able to play around with it. I'm not fond of my midi length, but a maxi might look good. In fact, I  like the look on the envelope, with leggings and a tee (both patterns are included, a nice touch). It would be cute with high-shaft boots, a turtleneck, a scarf. But this is Florida!!
OK, one pic on me...


I'll probably leverage this project and borrow my favorite elements for a tunic to wear over leggings this winter. Eventually. It really was fun to sew - the fabric and seam management were challenging, and it sure kept me out of trouble.

Ciao! Coco

Tuesday, August 23, 2016

New Look 6936 - a found object...


I've been on a bit of a quest lately, trying to get the upper hand on all that fabric stashed in bins in the loft. Because so much of it is pieces and bits. Why have I been keeping it all?

My first move was to take a critical look in my closet, which is home to fewer garments than it housed in January - the result of my closet bust and donation gig. But what about those things I really like, mostly because of the fabric, but don't wear?

I've taken my favorites and actually redrafted/resewn a lot of them. Whatever didn't make the cut got tossed. For good.

When I say tossed - I donate anything that's wearable. What doesn't suit me might be a glad find for someone else.


Anyway - this morning I pulled out the bin that's dedicated to knit 'scraps' and remnants. And I came across a whole dress! I made this for Jungle January 2016. But I guess I didn't like it :-) I've made it twice in the past, 2012 and 2013, and liked both dresses. I donated the short version from 2012, because I just didn't wear it, and I had no occasions in the offing. But the 2013 version is still in play.

Now - this one. I pulled it out - it was totally put together but had unfinished sleeves, hem, and waist casing. And an incredibly high neckline! I trimmed the latter, bound it with navy poly crepe, and attacked all the rest. And voila - a dress I really like. In fact, I'm wearing it as I write.

This is a nice pattern with lots of options:

On to my morning's work...


This ITY knit jersey is from Fabric Mart, and I had 5 yards with which to work. Which was a good thing, because I didn't want to end up with a very large lily splashed across the girls or my fantail. Large prints can be a real challenge! But I think I handled this one pretty well.


So, mark one up for a great save...this is perfect for home, very comfortable, keeps me just warm enough.

While messing around in that bin, I found loads of ITY remnants that would work together. So now I'm think about doing a version of Marcy Tilton's Vogue 9108, which includes the top, dress, and leggings. I bought the pattern when it came out, it's one of the few Marcy Tilton art-to-wear patterns that I really like. What fun piecing ops and such becoming lines.


However, even this one has some features that I'll decline - like the back treatment. Looks great on the model, but I cannot even imagine how those straps would work for me in real life. I'll try to capture the lovely lines of the back skirt, in a back bodice that's comfortable and wearable.


Happy Tuesday! Coco

Sunday, August 21, 2016

Butterick 6215 Tunic - Sunday Fun Day!


Well, that old August moon has had me up three mornings in a row at zero-dark early. I'm usually up by 5 a.m. anyway, but 3 a.m. is, well, earlier. However, I've always enjoyed the quiet and stillness of the early morning hours. They go great with fresh coffee.

I have a TV in the loft and watched listened to The Incredible Dr. Pol reruns for about 4 hours this morning, finishing this cute top.


I've liked this pattern ever since I found it - it's kind of funky, kind of Lagenlook, and it has lots of mix-match potential:


Last year I sewed View A and completely redrafted it to use fitted sleeves. That was a lot of work, and, afterwards, I didn't like it. The sleeves were stuffy looking and just didn't meld with the ruffle. This time I sewed View C, and I left those sleeves alone!


A few notes:

  • I sewed the Medium. Yes, it appears to have a lot of ease, but the Small would have grabbed me under the arms. And it's supposed to be full and swingy.
  • No pockets. IMHO, those are some weird pockets.
  • As with my first version, I brought the center front hem down a bit. The original curve line is just too extreme for my taste. 
  • And I added 1.5" to the hem, front and back. 
On Emile - I Iove that hi-lo hem:


The neckline is faced - and the facing fits! But be sure to staystitch both the neckline and the yoke edges before sewing. The instructions remind one about the yoke, but forget to mention the neckline. And it's needed - there's a lot of bias in the front, back, and yoke neckline edges.

Facing: cotton/poly broadcloth, which is more stable than challis.
Now the challenging part - my fabric. This is a pretty simple pattern, just seams, nothing fancy. My first version was cotton lawn, which is easy-peasy to sew. But this time I used rayon challis, which squirms, eludes, escapes, ravels... Aack. I spent more time pressing, pinning, and basting, then I did sewing. 

But it was worth it. This is incredibly comfortable to wear, and I like how it looks!

Pants - Pattern Emporium Harem Pants in ITY knit
I debated adding this next bit - but I will. Please please don't sew the armhole and sleeve the way Butterick suggests. If you look at it carefully, this approach leaves lots of raw edges at the armhole. Yuck.


An alternative: I serged the side seam allowances, continuing about 1" into the armhole area. Then I stitched the sides with a 5/8" seam and pressed them open. When I hemmed the sleeve, everything came out nice and tidy. This approach, or a variation, works with just about any 'kimono' sleeve.


Parting shot: It's Sunday, and my sewing loft has reached it's maximum messiness level. But I don't mind. 


I hope everyone is enjoying a safe weekend,

Tchau! Coco

p.s. Blogger got really wild this morning and published this 2 times, plus put 2 drafts in my files as well. It needs coffee!

Monday, August 15, 2016

A balancing act...

Balancing. No, not my life - my dress!

In my original post of this dress, I was contemplating those sleeves. They just seemed a little too much for the dress. And I suggested that I might rework them.

But I didn't - instead I added a waistline feature to offset the sleeves, and, as it happens, bring some interest to the front of the dress.

This didn't happen overnight - I tried on the dress a couple times, fiddled with the sleeves. Nope. Nothing. Thought about ditching it! It kind of had me at a stopping place with my sewing. Thank goodness, somewhere around midnight Saturday, the idea of a tie hit me.

Lots of seam ripping, draping, messing around, removal of elastic in the front waistband, and re-sewing later...a tie I really like! The basics of the tie pattern:


The wide end is placed in the side seam, with 1 3/4" above the waistline seam, and 1" or so below it. And I added a 'preventer' belt loop at center front to keep the knot in place.


Voila!
 

 I'm super happy with the result...


So now I can think of my next project. Actually, I might try a tie on this dress, which has been hanging in the loft, taunting me since I disparaged it.


What is it with me and tie-front dresses this month? If someone would just create a pattern for the Mociun dress, I wouldn't have these challenges!

Parting shots: I finished my T-Shirt Graffiti pen escapade with my Willow tank, Washed and dried, pretty nice for a first attempt with these fabric pens.


And Monday, Monday. I started the day with a 3-hour wait at my Honda place, while they replaced an air-bag that's been recalled. I almost finished this Felicity slouchy hat. I love love this pattern by Wanett Clyde. Check out those crystal polo beads, totally inspired by Roobeedoo's beaded Amulet shawl, which is absolutely stunning.


Ciao! Coco

Thursday, August 11, 2016

McCalls 6552 Fashion Star Dress - revisiting...


I've been rummaging my pattern stash, looking for something different to sew, because I've been so underwhelmed by pattern releases all year. And I have so many patterns that I can mash-up elements for something new. But I found one - I made this pattern way back in 2012, when it first appeared, and I thought it was a nice little dress. But I had some issues with it, for which I totally blame myself: I used polyester seersucker and lined it. It was incredibly hot and uncomfortable to wear - so I didn't.

So I pulled out a cotton calico from JoAnns that I've been avoiding. I just don't like the print! That's awful, isn't it, to blog about something one just doesn't like? But I was thinking 'muslin' - I wanted to see if a calico, one of my favorite summer fabrics, would work.

Got a little peek-a-boo going on...
And actually, I quite like the calico. But as so often happens, I discovered a little problem with the pattern design: those kimono sleeves are big and might even look a top heavy on the dress. I didn't feel that way about the seersucker version, which has more drape. But, hey, I'm not going to wear this in charmeuse, crepe, or jersey knit in 90+ degree weather!


Mr. Michael Phelps has nothing over me on wingspan... I'm loving the Rio Olympics!


So, I'm thinking about redrafting the arms - there's plenty of fabric in them to play around. Why bother? Because I love the lines on the bodice and skirt...


About that peek-a-boo front. It's really not 'bad', and a little cami-bra would add some modesty. I'm just feeling lazy this morning.


I redrafted the front on my original version, so that it has a 3.5" crossover (info and pics in the first blog post). And this bodice is the same. Ah-hem - without the change, this bodice would be open to somewhere above my navel...which qualifies it for a very sexy nightie.

Just a couple sewing notes:
  • The skirt is short - I didn't add to it and barely managed a 3/4" hem (I'm 5'7").
  • I don't care for the suggested finish on the neckline, so I used self-fabric bias binding, finished to the outside for comfort. I used my favorite 1/4" quilting foot, Juki foot P - it positions the needle at the perfect place for top-stitching the binding...


  • OK, a gratuitous shot of favorite Juki feet. Mr. I, on the right, positions the needle 3/8" from the fabric edge. How useful is that! I've collected about 60 feet from various machines, and this is the only true 3/8" foot I have.


  • Finishing the curve in the armhole - kimono sleeves can be tricky, kind of tight and awkward, and it's nice to relax the curve. I sewed it with a 5/8" seam allowance and trimmed it on the serger. Opening the curve (kind of pulling it backwards), as it goes under the needle, adds a little ease in the seam. 


  • The pattern has a self-fabric drawstring, inserted in a casing formed from the 7/8" seam allowance at the skirt/bodice join. Kudos to McCalls for at least using a wider SA, something that's often overlooked in other patterns. Nonetheless, I used a 1" seam allowance, which gave me comfortable room in the casing - and I inserted 1/2" knit elastic, no drawstring. IMHO it's a little classier without it.
  • And I added patch pockets across the side seams, 9.5" wide and 7.5" high (avoiding the floppy pocket bag of an in-seam pocket). Since this is a simple cotton, I didn't line the pockets. But I did finish them on the inside. 
A bottom corner of the pocket
Parting shot: 

The Zika virus is a very real concern in south Florida. Not every case gets in the news - it's been reported just 10 miles south of me. And Weston is fogging and spraying. I can really see the results, as my butterfly population has gone from clouds of the lovelies to just 2 or 3. So - I've emptied some of my bird baths, and I clean/refresh the two larger ones every day. Mosquitoes hatch so quickly. We don't get killing freezes down here, so the problem is likely to stick around...


Bye for now - Coco